Style Me Green

"Knock My Socks Off" Valentine Printable

Erika Blank1 Comment

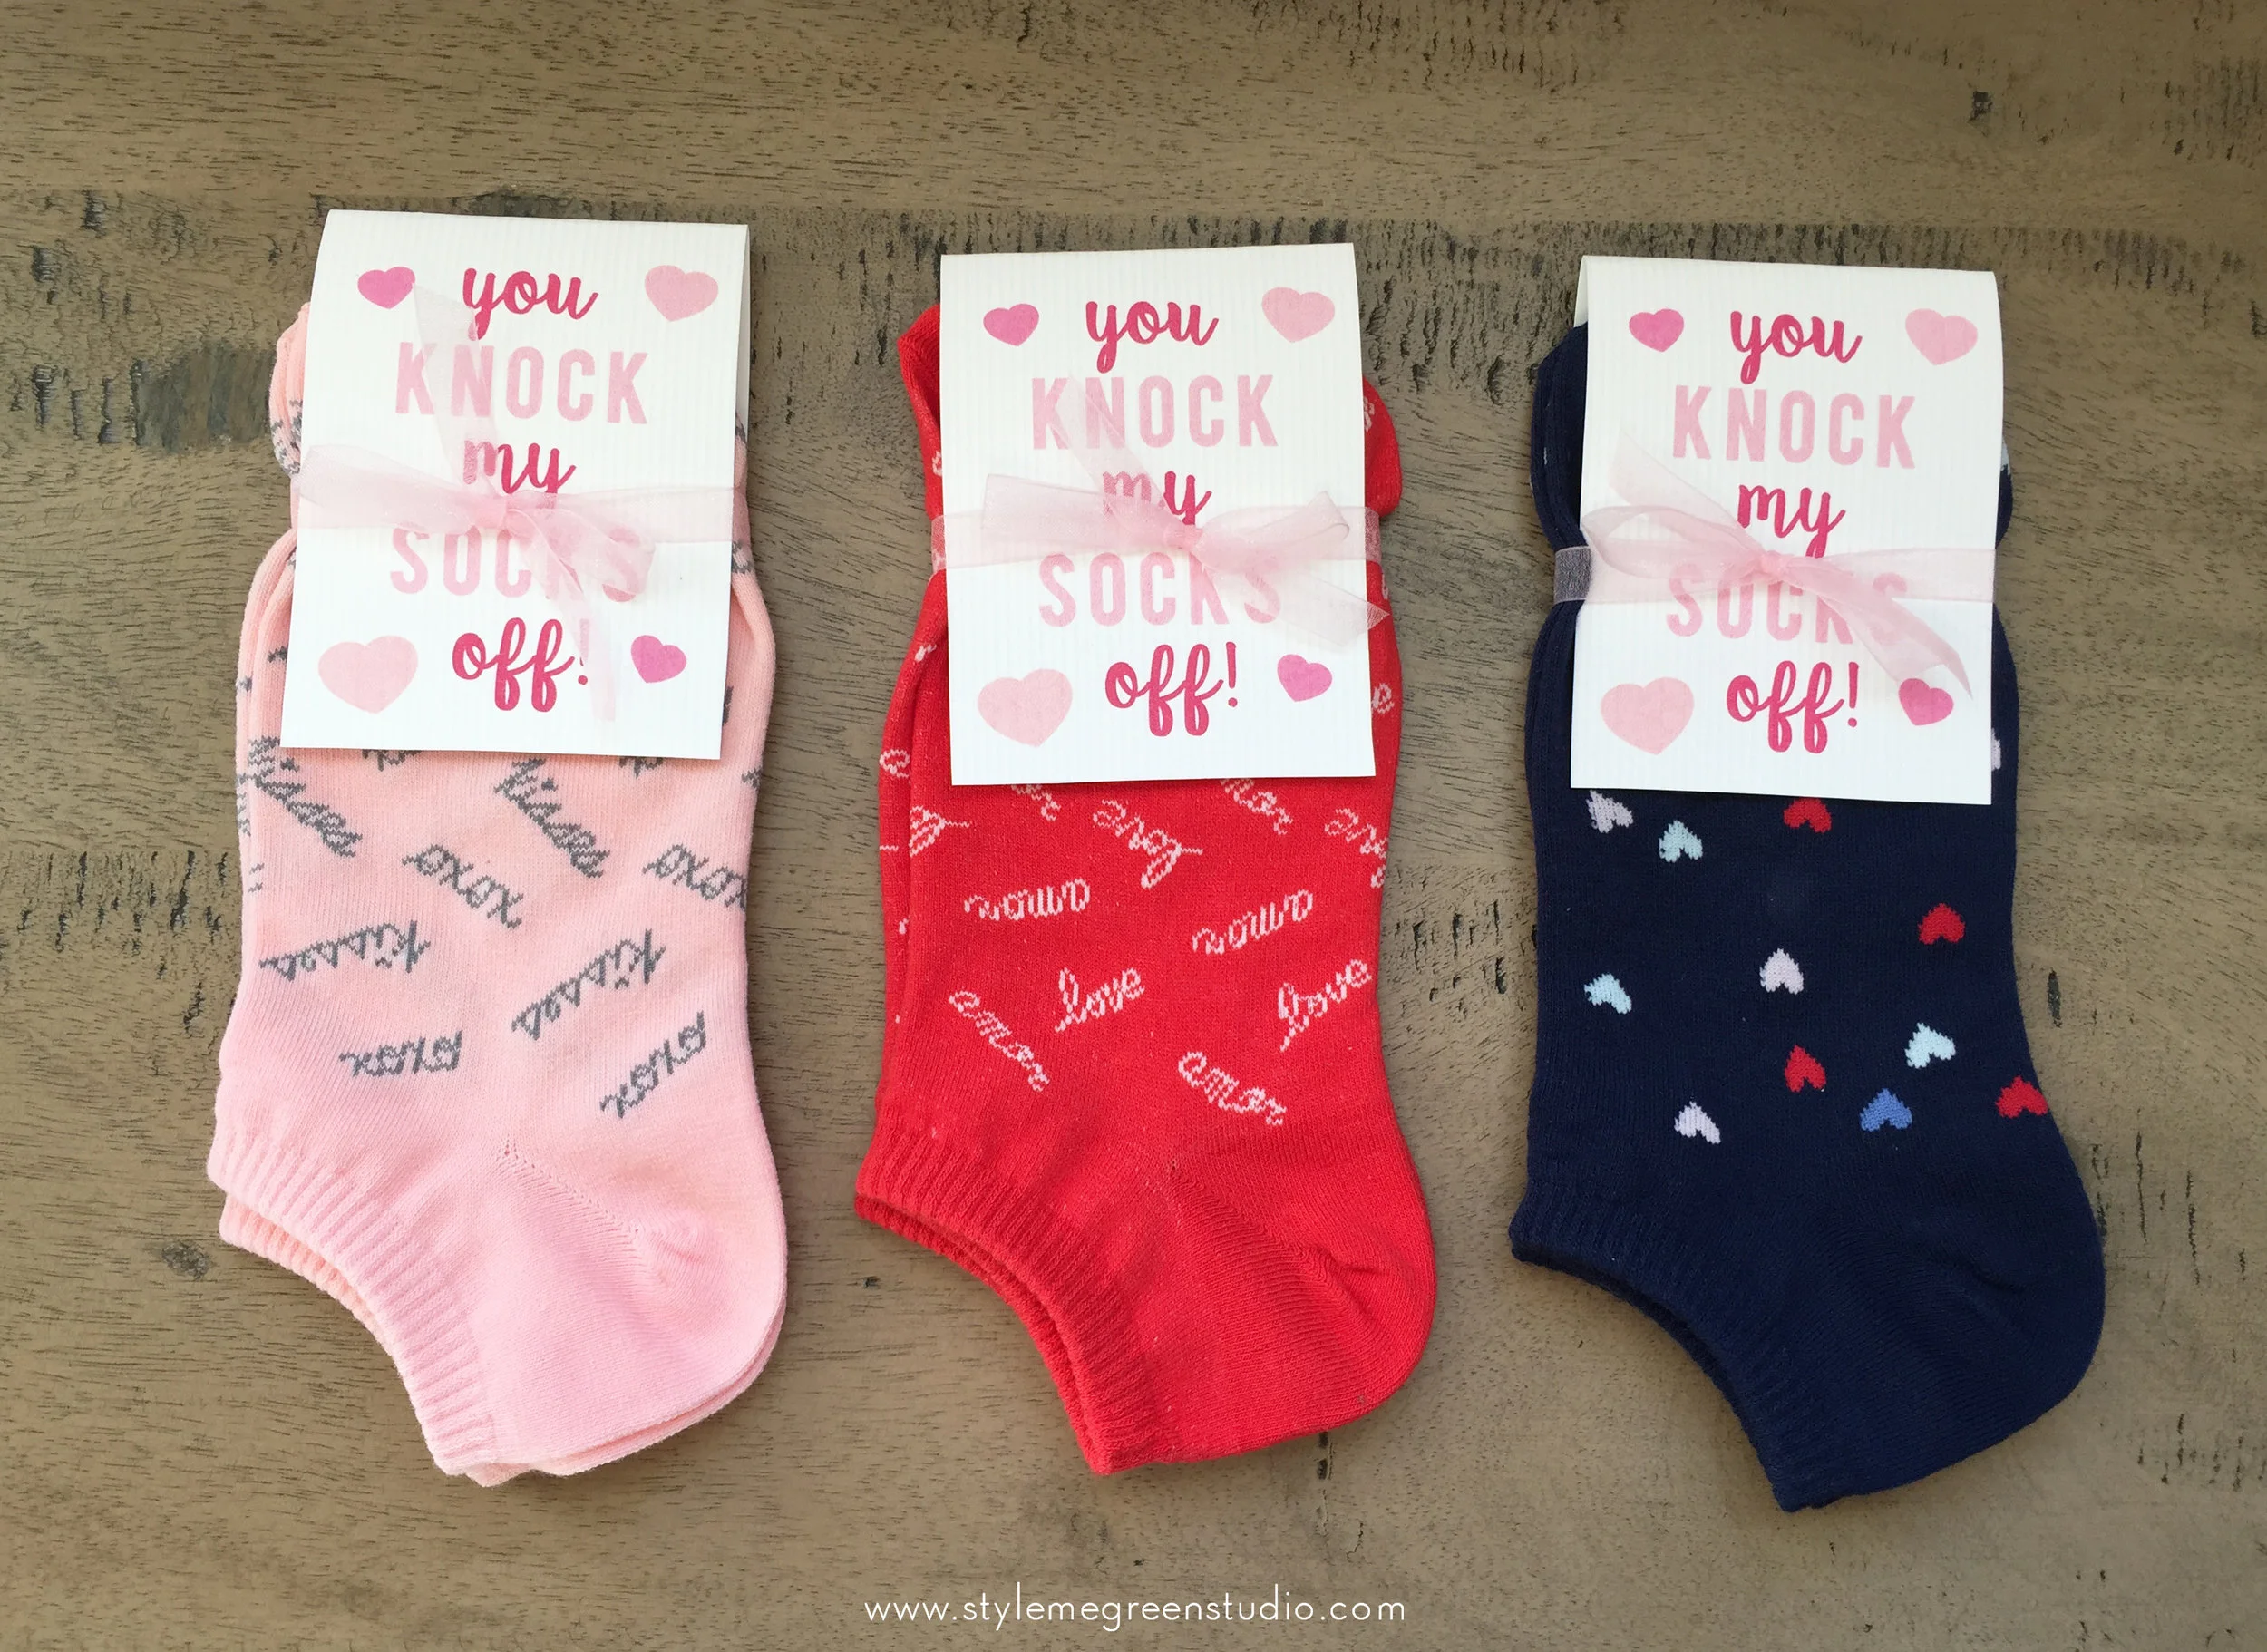
I love Valentine's Day, and I LOVE to give gifts, even more than I like receiving gifts.  So, as soon as I saw these cute socks at Old Navy I knew I had just spotted my co-workers Valentine's surprises. "YOU get some socks, YOU get some socks, YOU get some socks!" I'm still working my way up to Oprah's insane gift giving ability. But in the meantime, I put together a set of easy Valentine printables that you can use for a similar gift.

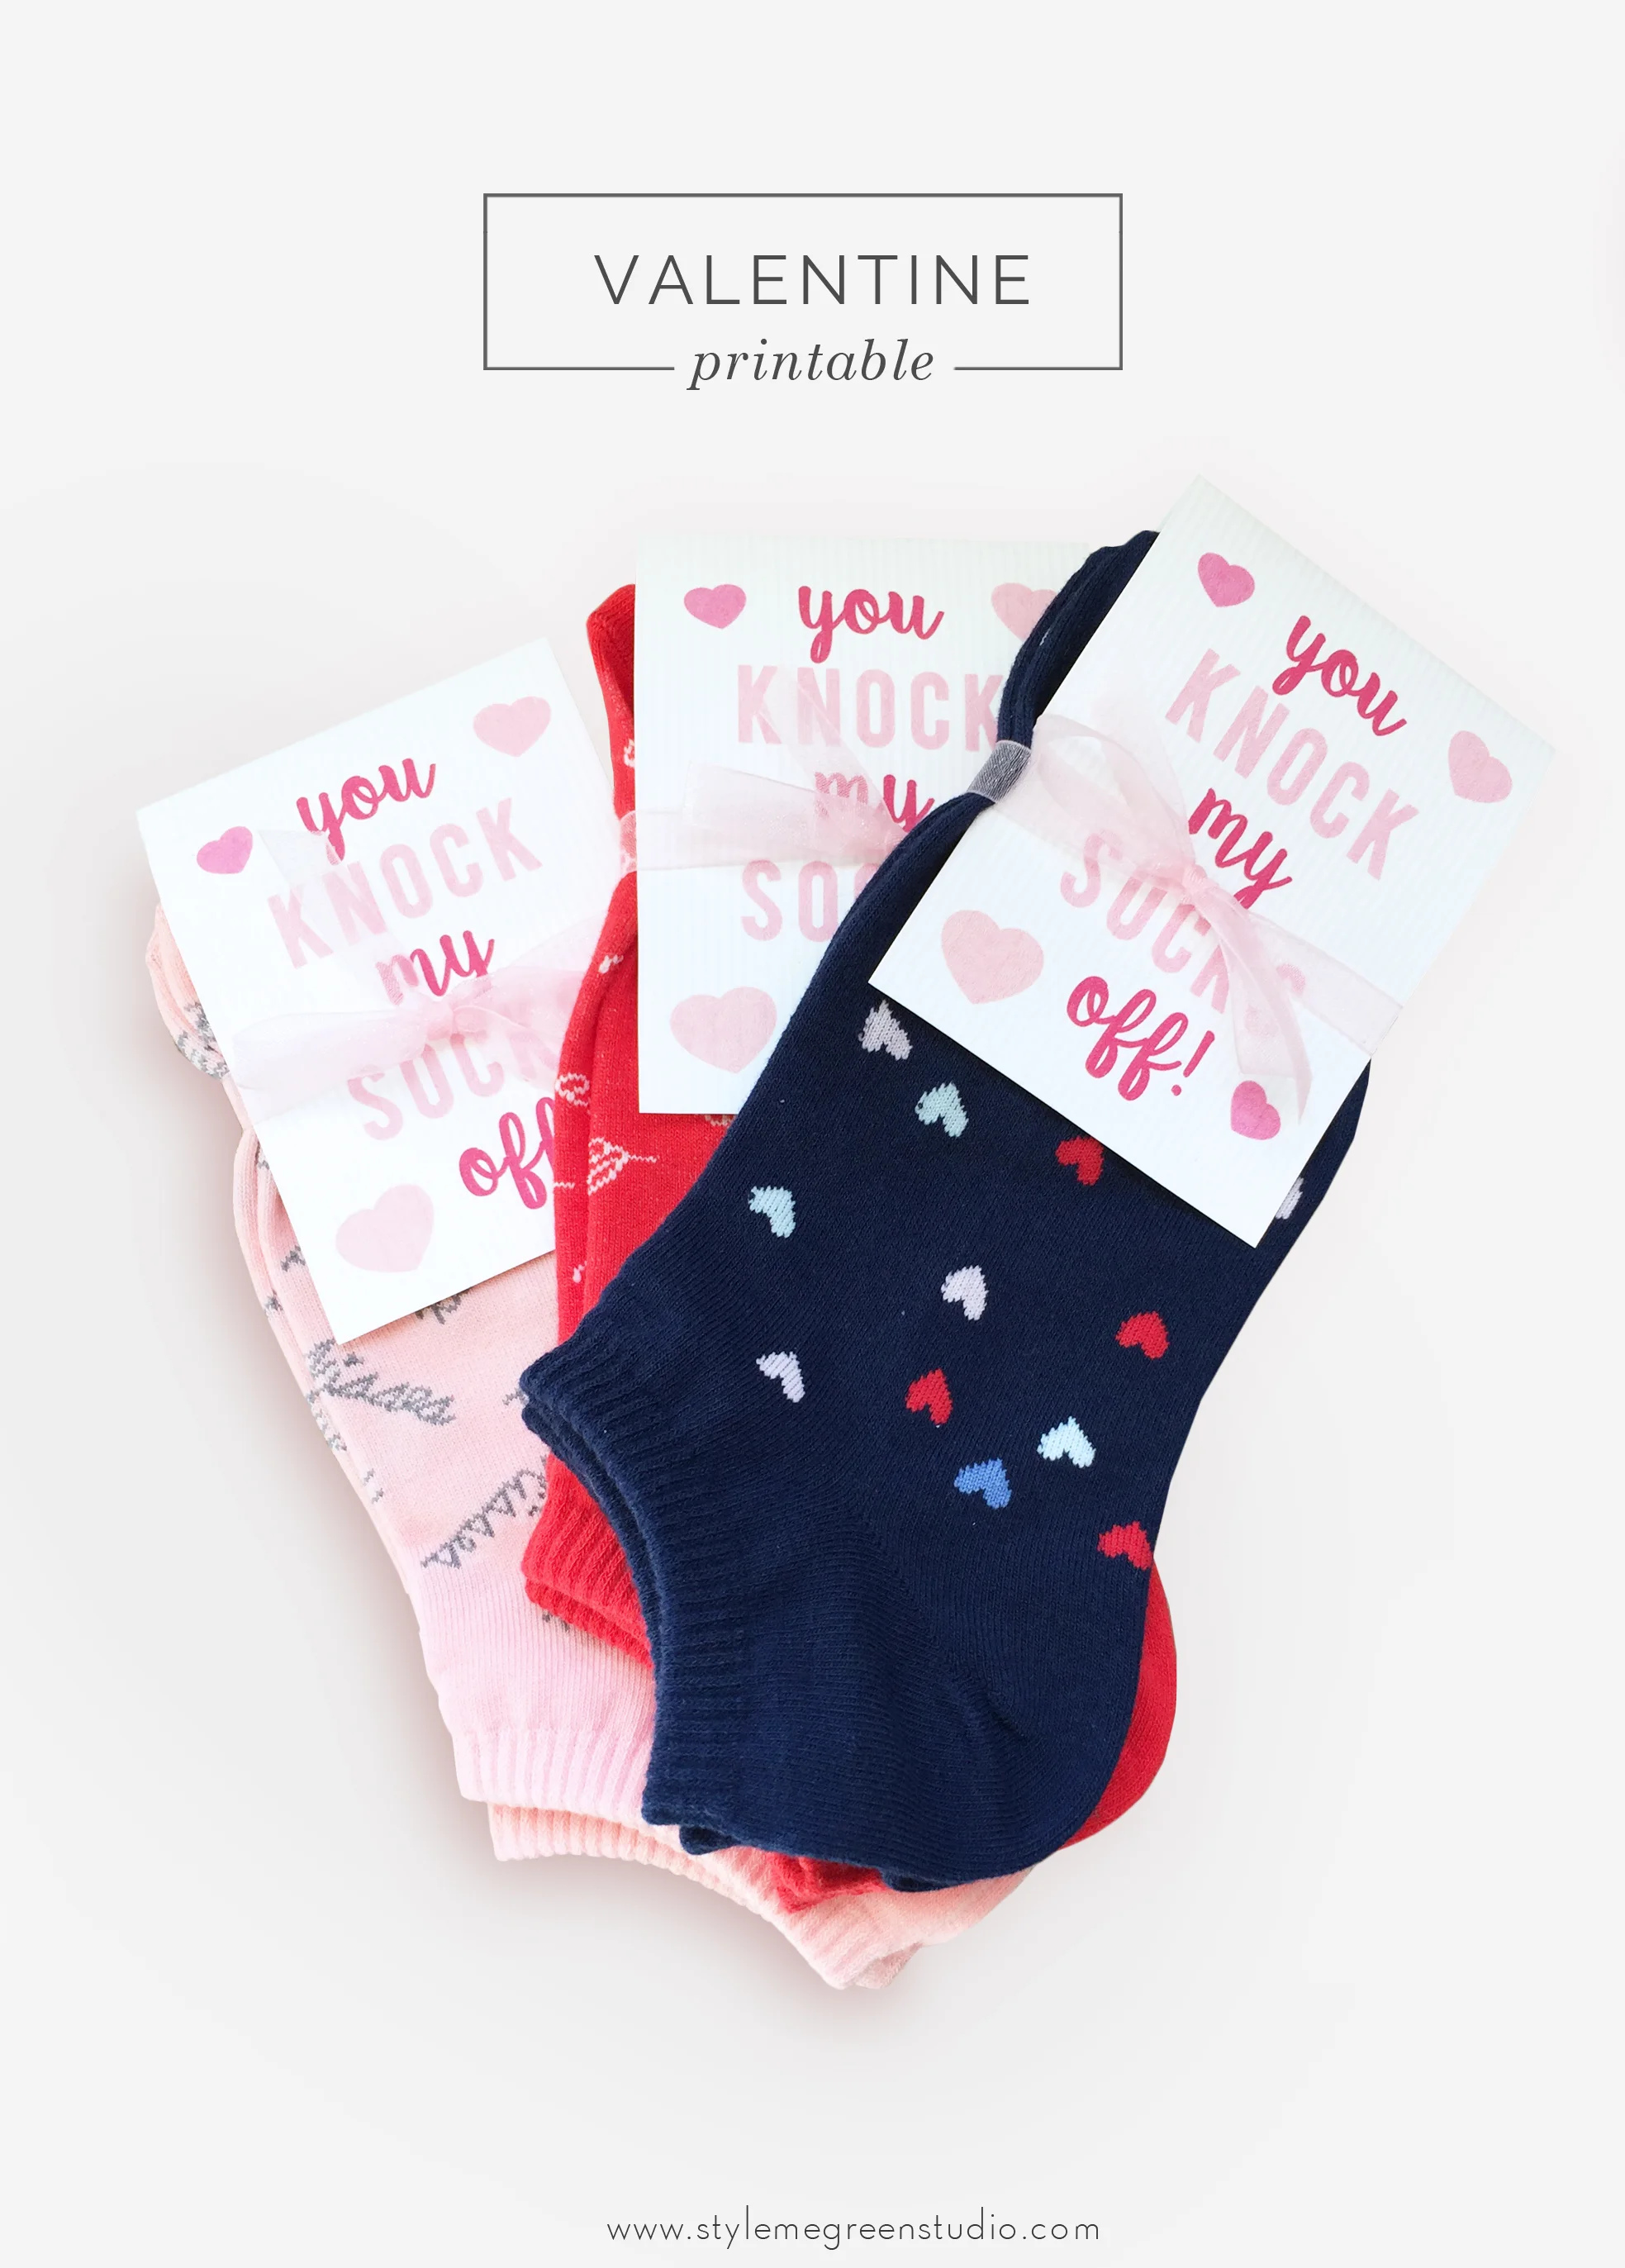
They turned out better than I thought they would. And they fold over so you can put your name on the back. You can download them all here.  

valentine socks

2016 Free Printable Calendar

PrintablesErika BlankComment

The 2015 Calendar Printable was such a huge hit, and I’m so glad so many of you have downloaded and love it. For the 2016 Calendar, I created a few new designs that I hope you’ll like! I wanted to keep the same format as last year's calendar, but with a clean modern feel. (Click image to download) I hope everyone has a great new year! We are trying to incorporate some new "resolutions" this year, simplifying our lives, streamlining work responsibilities so we can spend more time outdoors, and working on our fitness. Do you have any resolutions you are trying out this year?

Free Desktop Wallpaper

Digital WallpapersErika BlankComment

I have been so in love with soft pastel watercolors lately, and I have't done a free wallpaper download in a while. So put those two things together and ta da! I love to have a consistent background on all of my devices, my true OCD shines through, so there is a link for your phones and tablets as well.  I think this one turned out so great that I will have to make some fun wedding suite pieces.

free download wallpaper

Download for all your devices:
2880 x 1800 Retina // 2560 x 1440 // 1440 x 900 // iPad // iPhone

Wedding Suites Sneak Peek

Wedding Suites, StationeryErika Blank1 Comment

We've rolled out a few new wedding suites in the shop this month. I have a few more custom designs in the works which will be added to the shop in late April. But in the mean time I wanted to highlight these few. As a little girl I always wanted wedding invitations with pink peonies. The floral peonies suite can be done in any color, although I've always been keen on the light blush color.

Watercolors have been on trend for quite a while now. Its easy to see why, they are simple and classic. They can be elegant, casual, or bohemian. Here I've mixed them with a modern calligraphy. I love how the blue one has a nautical feel, while changing the color to something like this deep Merlot color makes it the perfect pairing for a vineyard wedding. This suite can also be tailored to your wedding with a simple color change.

You can view both suites in the shop. To customize them just drop us a line at stylemegreenstudio@gmail.com.

2015 Printable Calendar

Printables, StationeryErika Blank3 Comments

I organized my office this weekend and realized I still hadn't changed my calendar. There's no better time than the present, so I sat down and whipped this one up really quickly. Better late than never, here's the 2015 Free Printable Calendar. It is formatted to an 11x17 size. I've made it available in the plain white and with the paint speckles. You can download them by clicking the following links. 2015 Plain Calendar or 2015 Speckled Calendar. 

2015 VALENTINE'S COLLECTION

Printables, Holiday, StationeryErika BlankComment

Valentine's day is one of my favorite holidays. I love making cute desserts, putting together fun cards, and pink is one of my favorite hues- so naturally this holiday combines so many of my favorite things. Last year's Valentine treats were a disaster to say the least, thanks pinterest... So this year I've decided to make these great sugar cookies from Julie Blanner, and print out these fun little printable Valentines for all my co-workers. Let's hope it turns out fingers crossed. In the mean time, I wanted to share with you the new cards and printables I came up with for Valentine's Day! The image below shows the new 2015 cards that I just added to the shop. You can view the rest of the Valentine's cards here. Or if you want to pass around some Valentines of your own you can see all of our printable cards here.  

NURSERY ART PRINTS

Erika @ Style Me GreenComment

The nursery collection launched in March and I couldn't be happier to have it almost complete. Over the course of about 2 weeks we found out that 8 close friends were pregnant, and then a few more joined the club a month later. I wanted to create gifts for the parents-to-be, and art is really the marriage of my two loves, interior and graphic design, so creating a collection of prints was a task close to my heart. I was inspired by stars, the moon, and dreaming. You can view the entire collection in our shop here. 

2014 FREE PRINTABLE CALENDAR

Erika @ Style Me GreenComment

I'm excited to ring in the new year! I usually don't party anymore, but I plan like it's 1999. I love organizing, making color-coated calendars, meal plans, you name it, I love it. I saw so many great printable mini-calendars this winter but I couldn't find any 11x17 singe-page designs. I don't give up easily, and the lack of designs inspired me to create my own 2014 calendar- one that you could download and print at home FOR FREE! I hope you all have a great year!

To download click here.

UPDATE: I added a few colors after getting about 30 emails requesting some other hues, and I was happy to oblige. For other colors click these links, yellowvioletbluesage.

HOLIDAY CARDS + CARAMEL SAUCE

Erika @ Style Me Green2 Comments

Last week was a bit of a Christmas prep blur. But I wanted to share our Holiday cards and neighbor/co-worker gifts with you this year. We always do our little gifts in a jar- this year it was caramel. And this recipe was not only easy but super fast to make, so if you are scrambling for something to make, look no further.

caramel sauce recipe.jpg

INGREDIENTS:

1 cup butter

1 cup sugar

1 cup dark karo syrup

1 can sweetened condensed milk

1 tsp vanilla

DIRECTIONS:

melt butter, sugar, and syrup, bring to boil. Boil for 4 minutes without stirring, then remove from heat.

Stir in 1 can sweetened condensed milk and the vanilla. Let cool for a bit before pouring into jars.

Makes enough to fill 4 half pint jars

After many requests here it is folks our 2013 Christmas year in review card.

FREE PRINTABLE CHRISTMAS GIFT TAGS

Erika @ Style Me GreenComment

I love wrapping presents! I know some people hate it, I used to be one of them, I would shove presents in gift bags with tissue, and call it done. Maybe it's Pinterest, or being surrounded by creative people, but now I get pumped to wrap gifts. I usually pick a color scheme to work within and just run wild. Last year it was kraft paper, black, and apple green glitter accents.This year it's all about red and white. I am so behind this year with a lot of our holiday projects, I'm blaming a late Thanksgiving... But, I was able to find the perfect white recycled gift wrap at our local art supply store, and a fun herringbone red ribbon so I hurried to get everything together.

If you are trying to get out of a wrapping rut just pick a few colors and stick to those- mix and match patterns and texture and everything you do will look great.

I created some fun tags to go with our gifts this year. You can download them for FREE HERE!

THANKSGIVING PLACE CARDS FREE PRINTABLE

Erika @ Style Me GreenComment

I'm still a bit stunned that Thanksgiving is a week away. I suppose that means I should have had my Christmas tree up like 8 weeks ago- oops. It seems like the time has flown out the window. Although reflecting on the year thus far, I am so thankful for all of the opportunities this blog has brought me, and all of the great friendships I have made because of it. And get this, you guys blew up Pinterest with that post about white chicken chili. So, thanks for being amazing readers, followers, and occasional visitors. It has meant the world to me - I am so thankful for all of you. I get to do what I love because of you. Also, sidebar I think that chicken chili recipe would be great with turkey leftovers!!!

As a thank you to all the great followers, I'm posting these free printable thanksgiving place cards. There is a formal set, and a more casual set. Hopefully one of them fits with your holiday. These place cards can be customized by typing in your guests names using Adobe Acrobat, or placing the pdf into a Microsoft Word doc. as an image and writing over the top. Or you can hand-write the names for a more personal touch.  Click here for the formal set, or click here for the casual set.

GARDEN VEGGIE OMELETTE BAKE RECIPE

Erika @ Style Me GreenComment

With the holiday's around the corner we have been searching for some quick easy meals we can feed our guests. Specifically, breakfast. We never eat breakfast, outside of protein shakes, so finding something filling that wasn't pancakes or waffles was a must. John had been wanting to try baking an omelette, and  I thought this one might actually turn out alright. And it was beyond alright. So good. Can I get seconds please? I have to emphasize that this was John's brainchild, and he did all the work, I can take no credit for this one!

INGREDIENTS:

6-8 eggs

3 cups spinach, wilted

1 bunch green onions, chopped

1 medium red pepper. chopped

1/2 cup shredded cheddar cheese

1/2 cup whole milk

2 oz goat cheese, crumbled

2 tbsp grated Parmesan

salt and pepper to taste

DIRECTIONS:

Preheat oven to 350. Wilt the spinach in a skillet. Scramble the eggs add milk. Chop the veggies, and stir into the eggs with the spinach and cheese. Grease glass baking dish, and pour in egg mixture. Bake for 20-25 min. Serves 4-6

WHITE CHICKEN CHILI RECIPE

Erika @ Style Me Green1 Comment

As promised here is the chili recipe we are obsessed with. It's our family's Halloween tradition to make chili before trick-or-treating. Since we are a bit too old for the trick-or-treating part, we decided that we would just keep the chili part of the tradition alive. So add this to your list of must try Fall dishes!

Ingredients:

2 cups cooked diced chicken

1 medium onion, chopped

1 1/2 tsp garlic powder

1 TB Vegetable oil (used to cook chicken if needed)

2 cans (15 1/2 oz) Great Northern Beans (rinsed)

1 can (14 1/2 oz) Chicken Broth

2 cans (4 oz) chopped green chilis

1 tsp of each: salt, cumin, oregano

1/2 tsp pepper

1/4 tsp cayenne pepper

1 cup greek yogurt (you could also use sour cream)

1/2 cup whipping cream

Directions:

In crockpot place cooked chicken, onion, garlic powder, beans, broth, chilies and seasonings. Heat thoroughly. (3-4 hours on low) Or bring to boil over stove, simmer uncovered for at least 30 min.

Remove from heat, add yogurt and whipping cream. Serve immediately.

HOMEMADE MARINARA FROM FRESH TOMATOES

Erika @ Style Me GreenComment

One of my favorite parts off Autumn is harvesting our garden. We had some early frost warnings so a lot of our tomatoes were picked early, most were still green. I tried letting them ripen up in a bowl last year, but learned they do better in boxes and paper bags. So this year we corrected our error, and had a bounty of tomatoes all at once. We diced some for salads, made a round of Ketchup, and ate tomato-filled foods for a week.

Despite our tomato binge we still had 7 huge tomatoes left and they were on the brink of getting too soft.  I couldn't stand wasting them, and I wasn't about to dive into the deep abyss of vegetable canning, NO, not over 7 measly tomatoes. Long story short, I made this marinara sauce, and it was so good, beyond good even. You can actually taste the flavors, it was so easy that I will never buy the canned stuff again. Seriously, your mouth is gonna be like, WHAT?!

INGREDIENTS:

6-8 large tomatoes, chopped

2 small onions, diced

1 clove of garlic, diced

1/2 T fresh basil

1/2 T fresh thyme

1/2 T fresh oregano

salt and pepper to taste

DIRECTIONS:

Chop the onions and garlic and saute in a sauce pan. When those have caramelized stir in  chopped tomatoes. Incorporate the fresh herbs. Let the sauce simmer stirring occasionally, the water from the tomatoes will cook off and you will be left with a thick, hearty sauce.

SEPTEMBER ECO FRIENDLY FINDS

Erika @ Style Me GreenComment

The changing of the seasons not only signals a change in wardrobe, but adjustments to your home as well. Think about it in the same way you would your wardrobe. Adding lush fabrics, texture and warmth can be easy if you start of small. A knit toss pillow, a wool throw, and some wooden accessories can cozy up a space, just like that. This month's favorites are a collection of small things you could add to your home to warm it up for fall. I just ordered #2 and I can't wait to snug it right onto the guest bed.

1/2/3/4/5/6/7

DIY TEACUP CANDLES (EMERGENCY CANDLES)

Erika @ Style Me Green1 Comment

I have been a little MIA in the last month because we had a forest fire, it was kind of scary, I won't lie. I have never had to evacuate my home before, and we had about an hours' notice to evacuate our house. With that little notice you really realize what is truley important in a crisis. Fortunately, we had our important documents all in the same place, and it was a matter of tossing in medicine and passports. Oh, and John hadn't come home from work yet, so I was doing all of this alone, and as organized as I am- I really almost forgot about the cat... but don't tell her because she already likes John better.

We made it through, and thankfully everyone and everything was safe. But in the wake of our evacuation I realized that we are woefully ill-prepared for other types of emergencies. We had no water/food stores, and didn't even own a proper flashlight that wasn't attached to our phones, until last week. (Don't worry if you search "emergency preparedness" on Pinterest you'll find everything you need from a weekend with no power, to straight-up "hide yo kids hide yo wife" status emergencies.) So in addition to my other emergency prep, I wanted to make some emergency candles- but I wanted them to look good.  I had empty teacups just sitting in the cupboard and they needed a purpose in life. So that's how this DIY was born. I would estimate that these will burn for close to 40 hours each.

Supplies:

Scissors

Teacups

Soy Candle Wax

Flat Braid Wicks (at least 3" longer than your container)

Microwave Safe Container/ Double Boiler

Hot Glue/ Wax Adhesive

Directions:

1. Clean your cup and dry completely

2. Place your wick in the center of your cup and glue it down with hot glue. You can also use wax adhesive for this step. Support your wick with a pencil/skewer/etc.

3. Heat wax according to package instructions. This is where you will add dye or scent if you choose to. I added a few drops of lemon and orange scent.

4. Pour into container. You can adjust the wick to make sure it is straight after you poor the wax.

5. Let sit until the wax is cool until the candle is solid. (If you have an uneven settling you can add more wax to the top to make it a level surface.)

6. Trim wick down to 1/4″.

DIY SUNSCREEN RECIPE

Erika @ Style Me Green7 Comments

We decided this summer we would make our own sunscreen.  I know it's a bit late in the season, but we tested out 4 different ratios of oil to zinc oxide before determining that this was the best one. This recipe shouldn't be the end-all and be-all answer to your sun prevention needs. I usually wear a hat and cover up when I am outside, as well as keeping a diet rich in anti-oxidant foods. That really is the best way to minimize your risk of skin cancer and premature wrinkles, while keeping it all natural.  But I think this recipe is a great addition to my normal sun protection tactics, and I could see a difference on days when were were out in the yard gardening.  If you want to substitute some of the oils in the recipe here's a handy chart of natural SPF.

oil with natural spf

Most of these can be purchased at your local market or health food store,

if not click each ingredient for a link on where to buy online.

INGREDIENTS: (1 oz = 2 Tbs)

DIRECTIONS:

1. In a double boiler, over low heat, melt the coconut oil, beeswax, and shea butter.

2. Remove from heat and allow to cool slightly prior to adding the vitamin E oil, zinc oxide powder, and essential oils. I poured my mixture into a glass jar to allow it to cool faster.

3. The oils and aloe will incorporate easily, but stir the zinc oxide until it completely dissolves.

4. Then pour  mixture into a push-up or roll-up dispenser.

You can re-purposed  used deodorant containers for this recipe too.

5. Allow your sunscreen to cool and harden overnight. If you are out in the sun for long periods of time, or swimming reapply often.

Notes:

If you don't need your sunscreen to be waterproof you can use less beeswax. If you aren't going to be using this around water you are probably okay with just 1 oz of beeswax.

SPF numbers are pretty insignificant when it comes to differences in sun protection. SPF 100 blocks 99 percent of UVB rays, while SPF 50 blocks 98 percent. SPF 30 blocks 96.7 percent, SPF 15 blocks 93%.

You'll want an SPF of more than 15 to block UVA and UVB rays, Zinc oxide blocks both UVB,UVA2, and UVA1 rays. More info on UVA and UVB here.

You could easily spend close to $30-$40 for all of the ingredients that you wouldn't already have if you don't make your own beauty product regularly, but you could get 4-5 batches before you'd run out of some ingredients. Keep in mind you can team up with friends and go in on the ingredients together.