Style Me Green

DIY SUNSCREEN RECIPE

Erika @ Style Me Green7 Comments

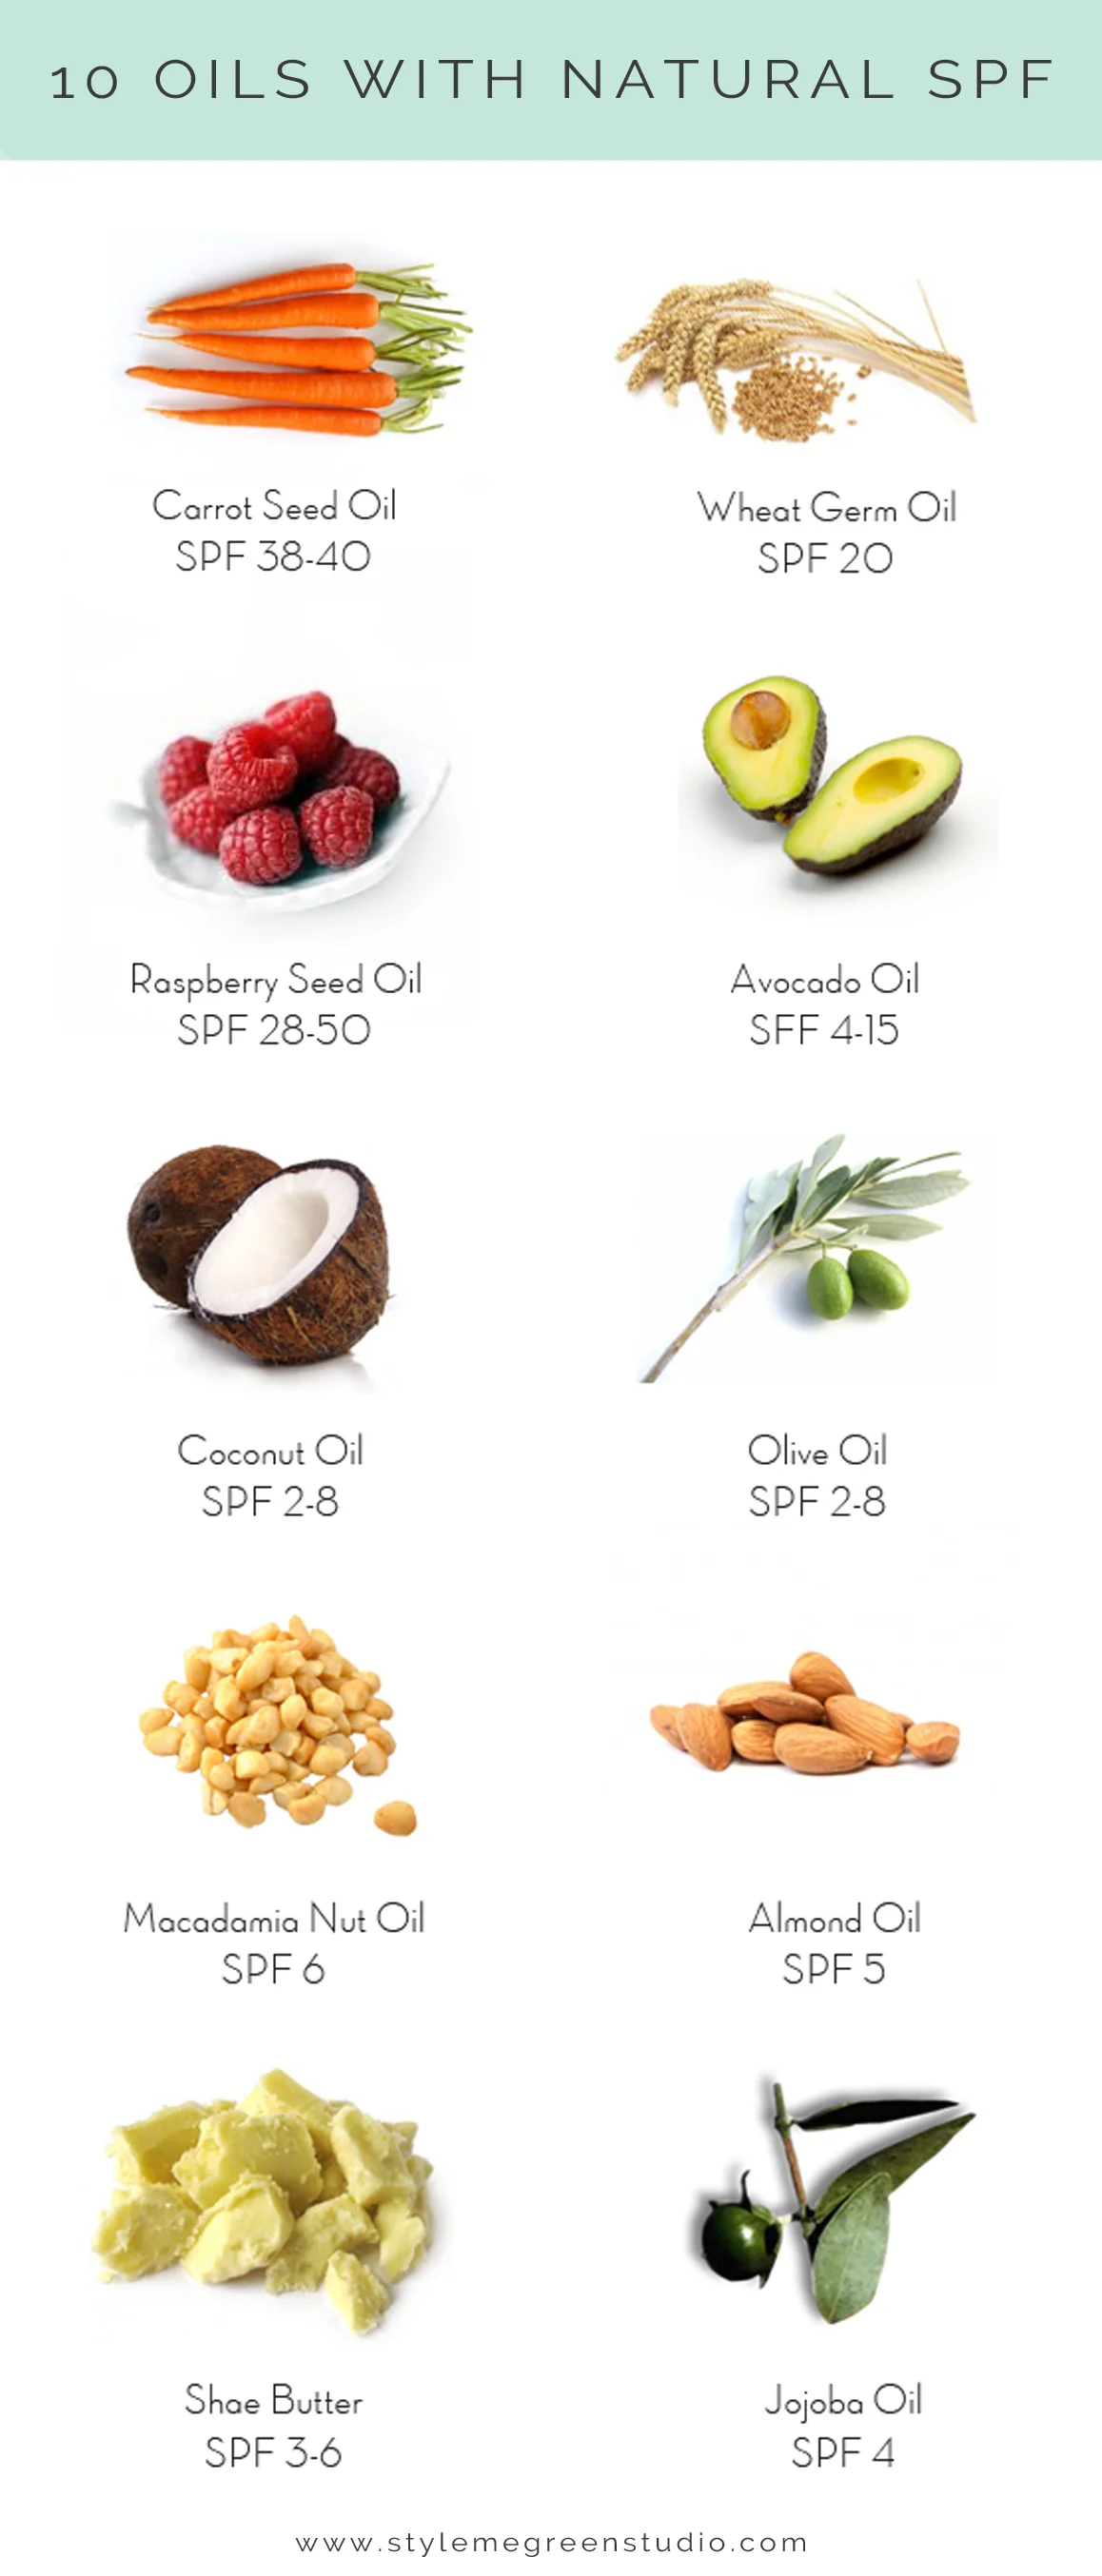
We decided this summer we would make our own sunscreen.  I know it's a bit late in the season, but we tested out 4 different ratios of oil to zinc oxide before determining that this was the best one. This recipe shouldn't be the end-all and be-all answer to your sun prevention needs. I usually wear a hat and cover up when I am outside, as well as keeping a diet rich in anti-oxidant foods. That really is the best way to minimize your risk of skin cancer and premature wrinkles, while keeping it all natural.  But I think this recipe is a great addition to my normal sun protection tactics, and I could see a difference on days when were were out in the yard gardening.  If you want to substitute some of the oils in the recipe here's a handy chart of natural SPF.

oil with natural spf

Most of these can be purchased at your local market or health food store,

if not click each ingredient for a link on where to buy online.

INGREDIENTS: (1 oz = 2 Tbs)

DIRECTIONS:

1. In a double boiler, over low heat, melt the coconut oil, beeswax, and shea butter.

2. Remove from heat and allow to cool slightly prior to adding the vitamin E oil, zinc oxide powder, and essential oils. I poured my mixture into a glass jar to allow it to cool faster.

3. The oils and aloe will incorporate easily, but stir the zinc oxide until it completely dissolves.

4. Then pour  mixture into a push-up or roll-up dispenser.

You can re-purposed  used deodorant containers for this recipe too.

5. Allow your sunscreen to cool and harden overnight. If you are out in the sun for long periods of time, or swimming reapply often.

Notes:

If you don't need your sunscreen to be waterproof you can use less beeswax. If you aren't going to be using this around water you are probably okay with just 1 oz of beeswax.

SPF numbers are pretty insignificant when it comes to differences in sun protection. SPF 100 blocks 99 percent of UVB rays, while SPF 50 blocks 98 percent. SPF 30 blocks 96.7 percent, SPF 15 blocks 93%.

You'll want an SPF of more than 15 to block UVA and UVB rays, Zinc oxide blocks both UVB,UVA2, and UVA1 rays. More info on UVA and UVB here.

You could easily spend close to $30-$40 for all of the ingredients that you wouldn't already have if you don't make your own beauty product regularly, but you could get 4-5 batches before you'd run out of some ingredients. Keep in mind you can team up with friends and go in on the ingredients together.

DIY FRAMED AGATE COLLECTION

Erika @ Style Me Green2 Comments

I have been searching for some interesting art ideas for the wall that is weirdly angled between our foyer and living room. Unfortunately for the decor I've had a movie poster hanging there since the day we moved in.  But it takes me forever to make design choices in my own home, so I waited forever before taking any serious steps to replacing the poster. 

We tend to gravitate toward collections in this home because we have 12' ceilings, which makes for a lot of wall to cover- and because collections inspire us. We've always loved going to museums and spending hours in the natural history wings, wandering through the dioramas and gazing at the fossils. When I saw what was hanging over the tub in  this showhouse in Utah I knew exactly what we needed for our space. 

Even though John loves agates and geodes, and I love pyrite- we selected agate slices to frame, because they were thin, yet colorful and would add dimension to space. I ordered my agates from Etsy. I tested out one agate in a frame prior to purchasing, because I did not want a shadow box frame.  and they were thin enough to rest against the glass, and still get the back of the frame on, I did have to pop the rubber feet off the back of the coasters, but they came off without a snag.

To complete the look I taped a piece of biscuit colored card stock to the back of my mat, and because I ran out of double stick tape I used a fancy tape loop on the back of the agate. Simple place the agate in the center of the mat and put the frame back together. I used frames from Michael's Craft Store, I also used the same frames for this project. And I stuck with my favorite brand of metallic spray paint, Rustoleum universal metallic - but this time I got the hammered metal, in the rosemary finish, it has a great greenish silver color.

It's from Home Depot.

CREAMY CILANTRO LIME DRESSING

Erika @ Style Me GreenComment

This is a super simple, homemade cilantro dressing that we like to add to tacos, or Southwest style salad. I've seen a few variations online but most called for mayo and a packet of processed Ranch dressing mix. We like to keep things pretty basic around here- so I started making homemade ranch mix in a decent sized batch a while ago, you can safely store it for about 3 months. And as a general rule if a recipe calls for mayo, I always substitute Greek yogurt, it cuts down on fat and has a fair amount of protein, its win, win! I've included the dressing recipe, and the homemade ranch dressing mix as well, but be warned that you will become addicted!

Ingredients

3/4 cup cilantro chopped, no stems

1 cup plain Greek yogurt

1/2 cup milk

juice of 1 lime

2 Tbs homemade ranch dressing mix (recipe below)

1 Tbs salsa, or green chilies

Directions:

Puree all ingredients in a blender or food processor until smooth.

Taste and adjust seasonings if necessary, if you want more heat add more salsa or chilies. I like mine mild.

Homemade Ranch Mix

Ingredients:

2 Tbsp. dried parsley

1 1/2 tsp. dried dill weed

2 tsp. garlic powder

2 tsp. onion powder

2 tsp. dried onion flakes

1 tsp. ground black pepper

1 tsp. dried chives

1 tsp. salt

Whisk all ingredients together until blended. If you want a more finely-ground seasoning mix, you can pulse the mixture in a food processor until it reaches your desired consistency.

To Make Ranch Dressing: Combine 1 Tbsp. seasoning mix with 1/3 cup Greek yogurt and 1/3 cup milk, and whisk to combine.

DIY OMBRE T-SHIRT

Erika @ Style Me GreenComment

I am FINALLY getting to some of the DIY projects that have been cluttering up my office. We've had a super busy, fun-filled summer- and between buying a new car, and our summer road trips we finally had an easy weekend at home. This project takes about 15 min. plus running it through the wash. If I had more time I would have boiled my own dye, but I was using this same tub of leftover dye to fix some shirts that got ruined in the wash, so I just used that dye for this project. If you have the time and patience I recommend making your own natural dye, here is a link. 

Supplies:

T-shirt

 Dye

Basin/sink

Rubber Gloves

Hanger

Hair Clips

Directions:

1. Follow the instructions for mixing your dye, and be sure to read the safety and cleaning labels because when they say it will dye your sink purple, they don't lie. (Stainless is easier to clean than white porcelain, so line your sink with a wash tub if you are unsure.)

2. I got my t-shirt wet first, and used a chip clip and a hair clip to hold back the sleeves from the dye. Hang your shirt on a hanger and slowly begin to fold it into the dye.

3. Once you have reached the desired height of your color lift your shirt out, you only want the color at the top of the shirt to be submerged for about 1 second.

4. Slowly pull the shirt out, I mentally divided it into 3 parts and let the shirt sit for about 3 min. at each level. At this point I felt like the bottom looked great, but that the line between the white and the first bit of color was too harsh, so I diluted my dye with some water, and I dipped it back in about an inch above my previous line. (it was so much better, so I recommend this technique for blending the color into the white.)

5. Then empty your dye and rinse the shirt until the water runs clear. Make sure you don't let the dye run into the white part of the shirt while rinsing. Hold the shirt with the white on top and let the faucet run through the dye until its clear. (If you have a sprayer on your sink it helps to use this too.)

6. Wash the shirt according to your dye instructions. Be aware that the white part of your shirt will probably get some of the dye run off in the washing machine, but that it's not a lot, or even enough to really worry about, and it helps the shirt look more blended overall, and not like stripes. You can see in the last two images above the shirt before washing and after washing.

FERN COLLECTION FREE PRINTABLES

Erika @ Style Me Green9 Comments

I have received quite a few emails about where I got the fern botanical prints in my bedroom. So, I thought I'd address the question with some free printables! I didn't purchase them anywhere, because I couldn't find ones that fit the frames I already had. Prints that did fit the frames, had a lot of other plants going on, and I just wanted a basic fern, no extra jib jab. So I ended up photoshopping my own prints from old scans I found at an online library archive. Library and museum archives are a great way to get a collection of prints if you are trying to achieve the look of a gallery wall for less, many of them have online scans. You can get my fern collection by clicking here. 

I simply printed them out with a basic color printer and placed them in my frames. I got these frames originally at Michael's craft store about 5 years ago, but they still sell the exact frame in a few sizes. (I have another fun tutorial coming up with these same frames) I believe they were 9.99 -- and they were all 50% off, so wait until they have a sale. I should also mention I spray painted them with my most favorite gold spray paint of all time- nothing compares- really. You can get it here. 

FOODS MOST/LEAST CONTAMINATED BY PESTICIDES

Erika @ Style Me Green1 Comment

Thanks to Pinterest my "How to Eat with the Seasons" post has been the most popular tip on the site. To go along with that I wanted to give you gals and guys a great resource on pesticides. I don't always buy organic fruits and veggies at the market- but I ALWAYS buy organic when it comes to the "Dirty Dozen" list below. Usually the prices aren't too much higher, and the trade off is well worth paying a few cents more. The "Green Fifteen" list are the fruits and veggies least sprayed with pesticides, so those are typically safe to buy in the non-organic produce department. Just keep in mind that some of the items on the good list can still be genetically modified to create larger fruit that doesn't necessarily taste better, I'm looking at you tomatoes and avocados...

fruits and veggies contaminated with pesticides

MUSHROOM BROCCOLI + RED PEPPER MELTS

Erika @ Style Me GreenComment

I hope everyone had a fun Father's Day. We made this recipe as part of the "5 week vegetarian challenge" and again on Father's Day with some homemade sweet potato fries.  I enjoyed seeing the look on John's face when he thought I was preheating the oven on to 500 degrees in the middle of June. His exact words were, "I always wondered what broil meant." We are learning to be master chef's one day at a time... I hope you enjoy. It's pretty good.

Ingredients:

1 head broccoli, cut into small florets

1 tablespoon olive oil

salt and ground pepper

8 brown button mushrooms, or your favorite variety

1 red bell pepper

balsamic vinegar

4 thick slices of focaccia or ciabatta bread

4 ounces Gouda cheese, thinly sliced

Directions:

Heat broiler, with rack set 4 inches from heat. Slice mushrooms and peppers, cut up broccoli into florets  Saute veggies with olive oil for about 6-8 min.

Place bread on a work surface. Dividing evenly, drizzle with balsamic, and top with vegetables, then cheese. Place on baking sheet, and broil until cheese is melted and lightly browned, 2 to 4 minutes. Combine bread into a sandwich or leave open-faced and serve. 

5 WEEK VEGETARIAN CHALLENGE MEAL PLAN

Erika @ Style Me Green2 Comments

We did it! We completed the vegetarian challenge, without breaking a sweat. I am so excited to share with you the meal plan and some recipes. For a printable version of the meal plan click here.

 It wasn't as hard as I had anticipated, and I only anticipated it being difficult because we would have to come up with a lot of new recipes for variety. But as soon as it began I welcomed the challenge. I really enjoyed trying new things, like making risotto for the first time. And I can tell you I feel better- not just because I know I was kinder to the environment- but because I feel like I have more energy, because I had fun cooking, and because I enjoyed not having to stress over "what's for dinner." We will probably keep this up for quite a bit. I plan to make a 5 week meal plan for each of the four seasons, so I always have recipes with seasonal fruits and veggies handy. For now we are happy flexitarians.

To make it easier for readers I tagged all of the recipe posts with the label "5 week vegetarian challenge" and you can find most of these recipes by clicking here. You can see the term "leftovers" in the meal plan, I set it up this way for 2 reasons. The first being, if we had leftovers they got eaten, and the second reason was to offer a "free space" each week. For example, if a social engagement came up on a Monday we would just swap that day with the leftover day from that week. The same goes for "salad," I stuck that in to help us eat the rest of the raw veggies we usually have lying around. We eat a large veggie salad at least once a week anyway, so that really worked for us.

ALOE + ROSEWATER FACIAL SETTING SPRAY

Erika @ Style Me GreenComment

The summer heat has really started to set in, which means my makeup is usually melting off my face.  A few weeks ago I talked to an esthetician who recommended a facial setting spray and listed a few brands she liked. She said it basically sets your makeup for the day and can really help those with oily skin. After reviewing some of her recommendations I wasn't loving some of the ingredients.  I then came upon a product that was not only ingredient friendly, but I thought I could make myself. If you aren't into making your own beauty products you can check out this option in the link below. 

Ingredients:

Witch Hazel

Green Tea

Rose Water

Aloe Vera (natural, in liquid form, not the gel)

Distilled Water

Essential Oil

Directions:

Pour 1/3 cup witch hazel into a 3 oz misting bottle (usually in the travel section of the drug store). Then  add 3 tablespoons of green tea, strained. Next combine 1 tablespoon of both aloe vera and rose water.

Add a few tablespoons of distilled water, and a few drops of essential oil if you prefer, it is for fragrance only.

After applying your make-up, Lightly spritz face and let dry, don't touch your face or move. (I made the mistake of looking down and got mascara on my under eye area)

BASIC RISOTTO WITH CAULIFLOWER

Erika @ Style Me GreenComment

I was a risotto virgin before we made this recipe- John had made it before, and I had indulged in some great varieties at restaurants. But I had been wanting to try my hand at making risotto, and our five-week vegetarian challenge gave me the best excuse. I adapted this recipe from this Simple Risotto recipe found here.

 If you need a basic risotto recipe that you can add mushrooms or other veggies to, this one makes a great base. I was surprised at how well this recipe turned out considering everything I had ever heard about making your own risotto.

Ingredients:

1 head cauliflower

2 tablespoons olive oil

1/2 teaspoon salt

7 cups vegetable broth (you could probably make this work with 6 cups if you had to)

2.5 tablespoons butter

1 large shallot, diced

3/4 cup dry white wine

1.5 cups Arborio rice

2 to 4 cups spinach leaves

1 cup parmesan cheese

1/2 tsp salt

 pepper to taste

Directions:

Preheat the oven to 450°F.

Place broth in a medium sauce pan and heat to a simmer; reduce heat and keep warm.

Cut the cauliflower into medium small florets. Toss the cauliflower, olive oil,and 1/2 teaspoon of salt in a bowl. Place cauliflower on a parchment lined baking sheet and roast for 30 minutes in the oven. You can stir them about halfway through baking. When they are tender and slightly browned they are done.

While the cauliflower is roasting, mince the shallot. In a large skillet add the shallot, butter, and 1/2 teaspoon salt, and heat to medium high. Once the butter is simmering, reduce heat to medium, and cook until the shallot is translucent.  Stir in the rice, coating it with the butter mixture.  Now you can increase the heat to medium-high and leave it there for the duration of the cooking process. Refer to the images above when adding your liquids.

Add  the white wine, I like to use Sauvignon Blanc when cooking. Stir the wine and rice constantly until liquid is almost evaporated. At this point, you can start adding the broth. Add the broth in 1/2 cup increments, and stir frequently until broth is almost absorbed. Repeat until rice is tender, but still al dente, you shouldn't let the rice absorb all of the water once it is ready because you want to have a bit of "sauce" left.

Stir in the parmesan cheese, and the cauliflower. We added spinach leaves because we had them, but you could also substitute kale or mustard greens. Keep stirring the ingredients until they are all incorporated and your greens have begun to wilt. Remove from the heat and season to taste.

PORTOBELLO SANDWICH WITH TZATZIKI

Erika @ Style Me GreenComment
We made this recipe on Sunday, because we had some leftover tzatziki sauce and I was worried it was going to go bad. Being on our 5 week vegetarian challenge has made us a lot more creative in the kitchen, and has really gotten us out of our usual dinner rut. I can't wait to share the whole meal plan with you- only two weeks left! What has probably surprised me the most on this menu is how we don't really miss some of the old meat dishes we usually ate. I was sure I'd be craving a burger by week three, but this sandwich rivals some of the best burgers I have ever eaten!


Grilled Portobello Sandwiches

Ingredients
2 portobello mushrooms
2 tablespoons aged balsamic vinegar (I love Nappa Valley Naturals brand)
2 tablespoons olive oil
Focaccia bread
Tzatziki sauce (see below)
1 Red onion
4 oz Feta crumbles


Directions

Preheat your grill to medium-high heat. (We don't have a real adult grill so I did this on the George Foreman, which is what we use for paninis as well).

Lightly drizzle your mushrooms with olive oil. I also used balsamic vinegar because I have been putting it on almost everything lately, and it makes the flavors really stand out. Brush on for an even coat and let marinate.

Make the tzatziki sauce, see below, then slice the onion.

Grill the mushrooms for 4-5 minutes on each side.

Slice the focaccia bread, and drizzle a bit of balsamic. Add a dollup of tzatziki, and layer on some onions. Cut the mushrooms in half, and lay one of the halves on each sandwich. Then add the feta crumbles, and the other half of bread. Serves 4


Tzatziki Sauce

Ingredients
1 cup plain Greek yogurt
1 cup diced cucumber
1/4 cup fresh dill – minced
1/8 cup lemon juice
1 garlic cloves – roasted
1/4 teaspoon salt
1/8 teaspoon pepper

Directions
Combine all ingredients in a medium bowl check for seasoning. Add more dill, lemon, garlic or salt/pepper if you wish! Serve immediately or store in the refrigerator for up to 5 days.

TOASTED GOUDA QUESADILLAS

Erika @ Style Me GreenComment

Our Vegetarian quest continues. This recipe is primarily why I couldn't be a vegan- I have pretty much given up dairy except for cheese, its my food weakness. You can't make a tasty quesadilla without cheese. We had family from Germany visiting us last week, one evening for dinner we had a great cheese plate- but so much smoked gouda left over. So this smoked gouda quesadilla recipe was born out of necessity.

gouda quesadillas

INGREDIENTS:

2 tablespoons olive oil

1 1/2 large onions (white or yellow)

1 1/2 tablespoons water

1/2 cup barbecue sauce

6 ounces smoked Gouda cheese

1/4 cup chopped cilantro

1/4 cup Italian parsley

4 flour tortillas

DIRECTIONS:

Slice the onions. Chop the cilantro and parsley. Grate the cheese.  In a large nonstick skillet, heat the olive oil, and add sliced onions. Saute for about 5 minutes, until soft. Add barbecue sauce and water; stir until the onions are completely coated. Turn off heat.

Spread onion mixture, cheese, and greens on half of each tortilla, and then fold in over, this way you can toast 2 at once. Place the quesadillas back in the skillet.  Cook until toasted and the cheese is melted, about 3 minutes per side. Cut quesadillas in half, and serve. I added a bit of avocado to mine, and John added hot sauce and salsa. We both loved them!

QUINOA AVOCADO CHICKPEA SALAD

Erika @ Style Me GreenComment

John and I decided to try out being vegetarians for a few weeks. Because we do our grocery shopping one day per week now, I decided to make a simple meal plan. That way we could make multiple dishes, with similar ingredients, so fresh fruits and veggies wouldn't go bad before we could get to the market again. (We live a block away, and tended to go everyday- which is great for having fresh food- but we wasted so much time!) This week we had dishes that included tomatoes, cilantro and basil. We created a 5 week plan, so I'll share a few recipes from each week, and at the end of the plan I'll share a printable file of the plan so you can try it out too! Last night's dish was this salad, it was filling and I loved how the lemon dressing brought out all of the flavors of the veggies.

quinoa chickpea avocado salad

Ingredients:

1/2 cup dry quinoa

2 cups water

1 can chickpeas, rinsed

1 cup cherry tomatoes cut in half

2 avocados diced

2 cups spinach

1 bunch cilantro

1/4 cup onion

2 small cloves garlic

For the dressing:

1/3 cup lemon juice

2 tsp. mustard

1 tsp. agave nectar or similar sweetner

2 tsp. olive oil

1/2 tsp. cumin

salt and pepper to taste

Directions:

1. Make your quinoa first. Add quinoa to the water and turn on the heat to medium high.  Let the quinoa come to a boil, then reduce heat to medium and allow to simmer. Cook quinoa for about 15-20 minutes, until the water is absorbed.  Remove it from the heat, but keep the lid on.  Set it aside.

2. Finely chop your spinach and cilantro. Add the greens to a bowl, and set aside.

3.  Next take your onion and garlic and finely dice those, and add to the greens mixture. Next add your chickpeas and diced tomatoes.

4. Dice your avocados, and add them to the bowl. I like to cut the avocado in half, remove the pit and slice them while they are in the skin (it's a lot less messy). Then stir in quinoa, and mix all of the salad ingredients.

5. Make your dressing by whisking all the ingredients together. Pour over salad, and mix until combined. I like to put it in the refrigerator for about 10 min. I think it tastes better slightly chilled.

DIY CONTAINER HERB GARDEN

Erika @ Style Me Green3 Comments

It is still a bit to early around here to get our real raised beds planted. I wanted to get our herbs going so that we had as much time as possible for them to mature. I had set aside this old crate I found at an estate sale last year, and it turned out to be the perfect home for our herbs!

I had to line the interior with plastic, because there were spaces in the base of the crate, and I didn't want the wood to rot. I used an industrial sized trash liner, and cut off the excess, so only about 4" of bag hung over the edge. Because my crate had handles I didn't want the level of soil above that, so I folded over the plastic and stapled it to the inside of the crate just below the handle holes. Then all you have to do is fill the bag with soil and plant your herbs. This would also make a great flower bed if you live in an apartment, and don't have a yard. We have one more crate hiding out in the shed, I think it will make a great Mother's Day gift.

ROASTED BRUSSLES SPROUTS

Erika @ Style Me GreenComment

I was craving brussels sprouts this weekend, which isn't a phenomenon I am accustomed to- So I picked some up at the market thinking I would try roasting them so the leaves crisp up like my kale chips. I was going blind here just hoping this was going to work- It must have been a long week because I didn't even think to k to Google "recipe for roasting brussels sprouts."  It took a little guessing on the time but I think I got it just right at 20 min. with a turn of the sprouts halfway through.  They taste so good this way, if you aren't a sprout fan you should really give them a second try. I'm hooked. 

roasted brussles sprouts

Ingredients

1 1/4 lbs brussels sprouts

2 teaspoons extra virgin olive oil

Salt and pepper to taste

Directions

Preheat oven to 450 degrees F.

Trim and halve sprouts. In a bowl toss sprouts, 2 teaspoons oil, and 1/4 teaspoon each salt and freshly ground black pepper to evenly coat. Place on an aluminum foil or parchment lined jelly-roll pan, roast 10 minutes, then turn them, and roast for 10 more min.

BANISH UNDER EYE CIRCLES NATURALLY

Erika @ Style Me GreenComment

Have you ever had one of those mornings where you get up, look in the mirror, and you look like you didn't sleep a wink. It only takes one person saying, "You look exhausted," or "Are you sick?" before you realize you probably look like a hot mess. It seems those unsightly dark under eye circles can say a lot about your health. Too much caffeine, stress, lack of sleep, and vitamin deficiency can be just a few culprits.  Here are some natural remedies to remove under eye circles.

how to get rid of under eye circles naturally

Chamomile Tea Bags

 Steep some chamomile tea bags in hot water, then rinse in cool water to create an eye-pack. Just putting these on your eyes for about 20 minutes will help reduce puffiness and can help diminish dark circles quickly.

As Cool as a Cucumber

Sliced cucumber on your eyes isn't just for the movies, it is a trick used by many  spas in luxury facial treatments. Just a couple of ice cold slices on your eyes will help reduce puffiness and tighten and tone the under eye area. (If you are in a rush and don't have a cucumber lying around the back of a cold spoon can have the same effect, in a pinch.)

Drink up, and Go Salt-Free

 Too much salt usually leads to fluid-retention, which  can lead to puffiness under your eyes. Remember to drink plenty of water and reduce your salt intake, it will help you flush out toxins. You'll notice a visible change in just a day.

Dark circles under the eyes are more prominent because that area is so delicate and thin. You can improve your overall skin tone and appearance with a healthy diet and exercise, but when those stressful times and sleepless nights start to take their toll, just take care of the problem with a natural remedy for long-term benefits.

HOMEMADE LOTION

Erika @ Style Me Green2 Comments

Winter is killing me right now, I have Spring fever like you can't imagine. John made fun of me the other day for taking a nap in the sun spot on the floor like a cat, its that bad. I have been trying to find simple ways to help combat the cold-month blues. One was getting my skin ready for spring! I love this simple DIY lotion recipe it only has 2 ingredients and its just about as natural as you can get. Coconut butter is an great moisturizer and promotes elasticity in skin, and extra virgin olive oil is filled with vitamin E. If you can't find coconut butter at your local market here is a great one.

homemade lotion recipe

All you have to do is mix two teaspoons of coconut butter and about 8-10 drops of extra virgin olive oil together in a bowl. Just apply a nice even layer anywhere your skin needs that added boost of moisture. I like to give my knees, elbows, and feet just a bit more attention. I like to make it in small amounts so that there isn't a lot left over. If you do have some extra, cover it and pop it in the fridge. (Be sure to label it, I have a whole shelf designated to beauty products in the fridge so John doesn't  accidentally eat my face masque or hair conditioner.)

HOW TO MAKE YOUR OWN CHALKBOARD PAINT

Erika @ Style Me Green1 Comment

I was at the craft store yesterday and saw a little bottle of chalkboard paint that cost $13.00 --excuse me-- that's more than we pay for Hulu and Netflix each month (aka how I get my Downton Abbey and Bachelor fix) So here I am to share my top secret chalkboard paint recipe with you. I love it because its so easy a child could make it, and you can use ANY color you can contrive! If I can convince John I might just paint an entire wall in my office to be my new chalk board inspiration wall.

Start with flat-finish latex paint in any shade. For small areas,  mix 1 cup at a time. Pour 1 cup of paint into a container. Add 2 tablespoons of unsalted grout. Mix with a paint stirrer, carefully breaking up clumps. Apply paint with a roller or a sponge paintbrush to a primed or painted surface. Work in small sections, going over the same spot several times to ensure full, even coverage. Let dry.  Smooth area with 150-grit sandpaper, and wipe off dust. To condition: Rub the side of a piece of chalk over entire surface. Wipe away residue with a barely damp sponge.

make your own chalk board paint

1 / 2 / 3 / 4 / 5 / 6

TORTELLINI SOUP

Erika @ Style Me Green1 Comment

I'm a huge advocate of eating soup in the winter, its easy, its affordable, and best of all it warms you up! We have been loving this simple tortellini soup recipe, because you can toss any savory veggies you have on hand right in and it always tastes great. I have made it on the stove or in the crock pot, its so easy and will impress any dinner guests.

tortellini soup recipe

INGREDIENTS:

2 celery stalks, chopped

3/4 cup sweet onion, chopped

2 large cloves garlic, chopped

3 spring fresh thyme

1 (15 oz.) can organic diced tomatoes and juice

4 cups low-sodium vegetable broth

10 oz. fresh tortellini

a handful of fresh parsley or spinach

Salt and pepper, to taste

DIRECTIONS:

In a large pot saute celery for about 3 minutes, stirring often, Add the onion and cook for 3 minutes before adding the garlic and cook for another minute. (You could also add corn, or carrots to the soup if you have them on hand)

Add the thyme, tomatoes and broth and bring all to a boil. Add the tortellini to the pot and cook according to the manufacturer package directions. Remove the soup from the heat, mix in your parsley or spinach (I usually use parsley because I have an aversion to cooked spinach) Finally, season with salt and pepper if necessary. Makes 4 large servings. 

HOME REMEDIES FOR COLD/FLU SEASON

Erika @ Style Me GreenComment
As you know I have been a bit MIA this month because I have come down with a serious cold, twice. I know, you are thinking how can I be that awesome. I refused to go to an actual doctor, because they were going to tell me what I already knew, oh you have a cold miss-- drink lots of water and sleep it off. So that's what I did for the first few days, and then I slept right through the premiere of "The Bachelor" and that's when I knew things had to change... No cold messes with my Monday nights and gets away with it. Here's where every cold home remedy I ever heard in my life comes into play. Some really worked and others were just an awful idea period, but here goes:


Spices: Ginger and Cayenne
Often used in traditional Chinese medicine to treat the common cold, ginger has long been a preferred home remedy for stuffy noses and sore throats. Its has anti-inflammatories that help to reduce the discomfort of a sore throat. Add 4 quarter-sized pieces of peeled ginger to 2 cups of water. Simmer for 15 minutes. Discard the ginger and enjoy the warm flavored water with a bit of honey and lemon.

Rich in capsaicin, a known natural expectorant, just a little bit of cayenne can go a long way towards easing unpleasant and uncomfortable congestion. When consumed, this healing compound immediately starts breaking up congestion in the throat and nasal passages while flushing out any potential infection-causing irritants. I tried pouring it in a glass to gargle- big huge mistake. My mouth was on fire for hours, instead try this:   Add a bit of cayenne to ginger tea or warmed lemon water. It is also a delicious addition to broth-based soups. Just remember to start small.


Garlic
Garlic is a known virus and bacteria killer, so if you have an ear ache/infection a few drops of garlic oil are supposed to ease symptoms and help fight of the infection. In addition you can prepare meals that have fresh garlic, and soak your feet in a garlic foot bath. I have never been this desperate, but I have been told if you do this at the beginning of a cold it will disappear the next day.

Fill a large pot with water and bring it to a boil. Use about 10-15 cloves of garlic, peel them, and smash them, don’t cut them. Then place the boiling water into a large bowl so you can soak your feet.  Put the garlic into the boiling water, and allow it to cool a bit before you stick your feet in. Chill out in your foot bath until the water gets colder than your feet. Dry off, and you are done!


Honey
If you have congestion in your nose, the chance is it has also migrated to your throat. And it just gets worse as you sleep.  Honey is supposed to be as good, if not better than cough syrup because of its antimicrobial and antioxidant effects. It's also soothing to an irritated throat. Before you hit the hay, take two tablespoons of natural honey. Mixing it with tea or warm water may help it go down easier.

Hydrogen Peroxide in your ears:
I got this one from a coworker, her daughter-in-law swears by it so I was willing to give it a go.
You take a solution of 3% hydrogen peroxide, preferably food grade and a dropper. Tip your head to one side and drop a few drops of hydrogen peroxide into your ear. It tingles for a second and tickles your ear, but that means its working! Let the hydrogen peroxide sit for a couple of minutes, then hold a cloth over your
Hold a washcloth over that ear and then tip your head to the other side to let it all drain out. Then Repeat for the other side.

I guess the theory that cold and flu germs could enter through your ears sparked this remedy. It works best if you do this right when you begin to feel symptoms, or you have family or coworkers who have already gotten sick.

 Apple Cider Vinegar
 It loosens mucus and helps turn the body alkaline when it is acidic. To help prevent colds mix 1 teaspoon of honey with about an ounce of hot water, then and add 1 teaspoon to 1.5 Tablespoons of the vinegar. Increase your vinegar use when sick, but for prevention purposes you can keep it lower.  This is a life saver. It helps prevent sinus infections too. Just don't drink the Apple Cider Vinegar straight from the bottle, trust me you will regret it for the next 5 min. The honey and water are there for a reason!

Salt Water
This is my go to cure because no matter what, I always have warm water and salt. You simply make a mixture of the hottest tap water you can stand an add about a tablespoon of salt to it, it should be really saturated. Then you proceed to gargle with it for as long as it takes to finish off the glass. Do this at the first signs of a sore throat and once it sets it if you ignored your symptoms. It soothes the irritation and helps kill the germs that are hiding out in there. Works like a charm, every time, and its so easy.